Shooting the stars at night can be a difficult but hugely fulfilling discipline in photography. We have all seen those utterly fantastic shots of stars streaking across the sky, or the milky way in all of its colorful glory, and marveled at this snapshot of the heavens.
The night sky can stir all sorts of imaginative thoughts, making you wonder who or what is out there, whether we alone, and just how these photographers take such fantastic shots!
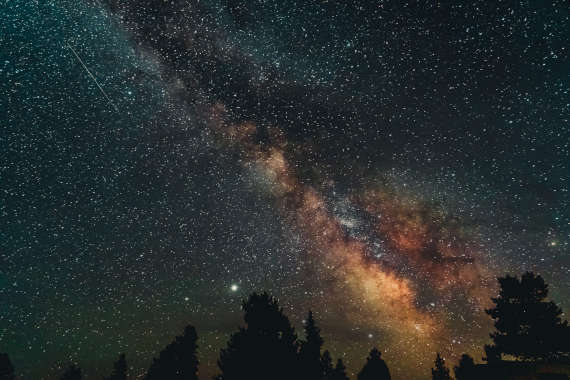
Photo by Lucas Davies/Unsplash
Well, there is good news and bad news for those who wish to emulate them. The bad news is that you really do need to have access to a DSLR, a good tripod, and lens. You will also need to develop an intuitive sense of how to use the camera settings and just where to point your camera in the night sky. The good news is that there really is no magic going on with the camera. The controls are there to be manipulated, and it is distinctly possible to learn how and when to use your camera to get these shots.
Ideally, you are going to want to get out of the city and into the country to avoid light pollution. The warm glow of the city lights tend to mask the true glory of the night sky, which I am sure that anyone who has spent time in rural areas will testify to. Coastal areas offer better visibility.
Aside from the post-processing, taking good shots of the Milky Way is also a matter of knowing just where in the heavens to point your camera. However, it is not needle in a haystack stuff, and you don’t have to be an expert astronomer or understand which planet is which, or which star is part of which distant constellation, to be able to figure it out.
Interpreting the celestial canvas is a matter of understanding the seasons, which dictate where the distant stars are in the night sky. If you really don’t care to learn this amazing science, you can always download a Stellarium, which will give you an idea of where to point your lens in the night sky. This will give you an idea of where to point the camera at a given time of year. For example, if you live in the northern hemisphere, you should point the camera up high into the night sky during winter and in the south during summer, where you will see Orion and the wider Milky Way. In the spring, the Milky Way is likely to be more on the western periphery of the night sky. During the autumn, you are most likely to see the Milky Way high above the western horizon.
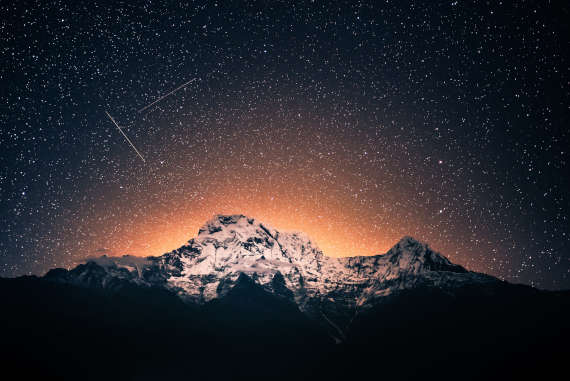
Photo by Arto Marttinen/Unsplash
Aperture
You will need a DSLR camera, as these tend to perform much more efficiently in low light conditions, picking up all sorts of data that we are barely able to see with the naked eye. The lens aperture is of fundamental importance. A wide open lens (say f/1.4 or f/2.8) allows your camera to gather the most light. However, this will come at the cost of sharpness toward the edge of your images. An aperture of f/2.8 can produce acceptable results, but you really do need a lens of the highest quality. Be careful not to stop too far back to, say, f/11 or above. However, at f/4 there may be a possibility that the blurred effect can be more pleasing than the sharp effect of stars at that aperture size. Therefore, it can often be better to accept a little blurring as a more pleasing result. Prime lenses tend to offer the best quality, but that comes at a cost. They often have a focal length which is not entirely suitable for the wide angle skyscapes you expect with astrophotography.
Focus
Focusing in the dark can be a troublesome business, but an important one. Achieving what is known as “hyperfocus” or “infinity focus” is the only way to ensure that as much of the scene is in focus as possible. However, this does not just mean just turning the focus ring to the widest setting. Hyperfocal distance is actually just short of this. There is a way around this though; focusing on a flash light placed around 50 feet away (or the distance to hyperfocus) can be just as effective as a more scientific method of determining the plum point on the focal ring. The second method would be to use live-view and zoom in (with digital zoom rather than optical zoom) and adjust the focal ring until the stars are sharp. In my experience, though, this is not always an accurate or stress-free way to focus on the stars.

Photo by Mike Petrucci/Unsplash
Shutter Speed
When taking certain types of astrophotography, it is actually better not to capture any movement in the stars themselves. This means you are going to have to limit your exposure time. In my experience, limiting to 20 to 30 seconds will probably suffice. Of course, the closer the stars are to the celestial pole, the shorter any movement will be, and vice versa. When looking straight to the north star, with a long focal length, you may even be able to extend the exposure to 90 seconds.
ISO
Manipulating ISO will also provide some control over both the number of stars in view and the quality of the image. These, unfortunately, are conflicting goals. The more you crank up the ISO, the poorer the image quality will be. ISOs of greater than 800 will produce noise, even when viewed at large scale. However, the benefits are that the camera is letting the light flood into the sensor, bringing out a number of distant stars that perhaps aren’t even visible to the naked eye.
See more on photographing star trails at http://www.squidoo.com/how-to-photographing-stars
About the Author:
Ray Devlin is from raydevlinphotography.com. “Photography has become a passion for me, which remains funded by my day job – a day job which takes up a vast amount of my time! I don’t necessarily want to share only my best images. Some of the images in my galleries represent shots that have more of a personal meaning to me; images that I simply couldn’t resist sharing.”
Like This Article?
Don't Miss The Next One!
Join over 100,000 photographers of all experience levels who receive our free photography tips and articles to stay current:


Leave a Reply