Using a reflector is an affordable way to bring a little extra light into your studio shots. While they’re relatively simple to use once you are familiar with how they work, there are few things you should know when you are just getting started. Join Gavin Hoey in the video below as he walks us through a portrait session and shows us how to use reflectors:
For this session, Hoey used a Westcott 5-in-1 40″ collapsible reflector. These 5-in-1 models are handy because of their versatility and ability to fold up to a compact size. They are also light enough that your subject can hold them during a headshot session, though Hoey doesn’t recommend it since he says that can distort the subject’s shoulders.
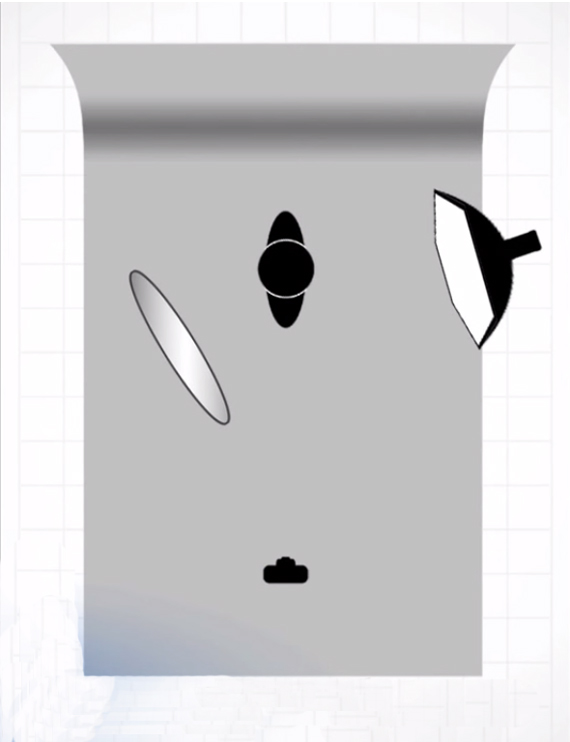
Here’s a diagram of Hoey’s lighting setup for this shoot.
With the model facing a large octobox, Hoey placed the reflector on a boom just to the back right of the subject. By placing the reflector here, Hoey effectively bounced light onto the camera side of the model’s face. Using this setup, Hoey made the photograph below:
In the video, Hoey also discusses his favorite way to process his RAW images into black and white using Photoshop. The process utilizes the Black & White Adjustment Layers, which make for a non-destructive edit. Starting with the default settings, he adds some minor changes to the Adjustment Layer using Targeted Adjustment which allows him to click on any part of the image and quickly change it by dragging the cursor to the left or right.
“The reflector really is one of those must have gadgets. Every studio, every photographer should have a reflector.”
Like This Article?
Don't Miss The Next One!
Join over 100,000 photographers of all experience levels who receive our free photography tips and articles to stay current:






Leave a Reply