One thing to note about digital photos before we go on… the picture format which you use. If you’ve set you digital camera to capture in JPEG format, it is likely you’ve encounter some loss of quality in the picture due to image compression. In this case, it does make sense to apply sharpening on the photo. If, however, you’ve selected to shoot in RAW mode, then you’ll unlikely face any image degradation – sharpening a RAW image isn’t necessary as often.

Using Unsharp Mask to Sharpen Photos
1. The Unsharp Mask
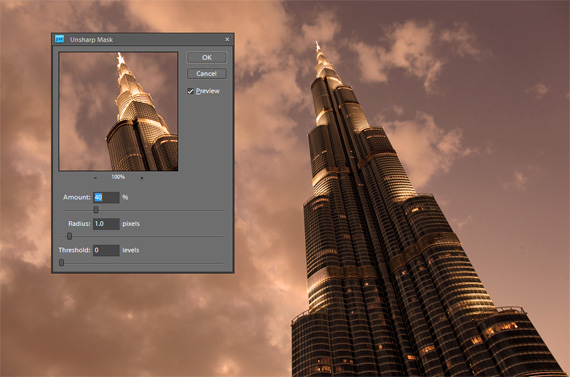
The Unsharp Mask tool is common in many photo editing software programs, including Adobe Photoshop Elements and Corel Paintshop Pro. Typically, when you apply the Unsharp Mask, you can control 3 factors – the Amount, Radius and Threshold:
- Amount – this refers to the intensity of the sharpening
- Radius – this refers to the distance sharpening occurs around a pixel)
- Threshold – defines when sharpening starts to occur when two points are different in brightness
Learn to play with these three factors to obtain the optimal amount of sharpening in a photo. Apply just enough sharpening but don’t over do it. Sharpening a photo too much will usually make the edges in the photo too “harsh” or visible.
2. Smart Sharpen
Another tool at your disposal when sharpening photos is the Smart Sharpen tool. In Adobe Photoshop Elements, this tool is available as the Adjust Sharpness option within the Enhance Menu. Other photo editing programs (e.g. Corel Paintshop Pro) have similar tools but under different names.
Typically, I’d make sure that I perform the sharpening step as the last step in the photo workflow. That means that I’ll clean up the image, adjust its color, tone, brightness, etc. and flatten the image before perform a sharpen. I find that ultimately yields a better looking image in the end. The nice thing about invoking smart sharpening tools is that all the settings have been built into the sharpening algorithm already – the program will select the most appropriate sharpening options for you.
3. Advanced Sharpening Tools
If you’ve used Photoshop Lightroom or the Adobe Camera Raw plug-in for Photoshop, you’ll realize that these programs give you much more powerful photo sharpening toolkits. The algorithms for sharpening in Photoshop Lightroom and Photoshop far surpass what you see in simpler packages like Photoshop Elements and Corel Paintshop Pro. In fact, the tools in Photoshop Lightroom are so good that I’d highly recommend that you buy a copy if you’re a serious digital photographer.
Also, here’s a little known secret about working in Photoshop Lightroom. Press down the Alt (PC) or Option (Mac) key as you adjust any of the sliders and the sharpening appears in black-and-white, which is much easier to see. If you’ve used Lightroom to some extent before, you’ll know this tip is a great help.
There are dedicated photo sharpening tools out there. One of the programs I like a lot is the Nik Software Sharpener Pro. The sharpening algorithms in this package match those in Photoshop Lightroom and you can tell the difference in the sharpened image’s quality, as compared to those sharpened by more inferior programs.
Helpful Video Tutorial:
Use the Unsharp Mask filter for complete control over your image’s sharpness. Remember to use Layer Masks!
Conclusion
In summary, sharpening is a common procedure in photo workflows. However, to ensure that your sharpened image looks good – you should be sure what kind of sharpening settings you should apply – set these either manually or through a smart sharpening tool. If you’re a more advanced user, you should try using tools like Adobe Photoshop Lightroom, the Adobe Camera Raw plug-in for Photoshop, as well as the Nik Software Sharpener Pro – all of which have very good sharpening algorithms.
So until next time, here’s wishing you luck in editing your photos!
About the Author:
Gary Hendricks runs a hobby site on digital photography with tips and tricks on digital cameras, as well as shooting great photos.
Like This Article?
Don't Miss The Next One!
Join over 100,000 photographers of all experience levels who receive our free photography tips and articles to stay current:


Don’t forget Topaz Detail – superb sharpening tool – whether shooting in RAW or JPEG.
Wow, you forgot to mention 3 different stages and reasons to sharpen: out of camera (minimal), for web or for print.
And NOT to sharpen noise…fix it first.
This tutorial is totally wrong! RAW images always have to be sharpened unless you have a camera that does not have a low pass filter.
Jpeg images are sharpened “in camera” by the camera’s own processor and therefore do not need any further sharpening.
You really should check out the credentials of your contributors.
And what about how to do in LR? It only shows on PS.
Nice class
This “tutorial” is just a list of the major sharpening filters. It offers no information on how they work, and no guidance on how to go about using them. It ignores high-pass sharpening.
There are many tutorials on the web that actually explain this. For example: http://psd.tutsplus.com/tutorials/photo-effects-tutorials/professional-sharpening-techniques-in-photoshop/
Also, I agree with Knips about RAW vs JPG.
Wait a minute…”If, however, you’ve selected to shoot in RAW mode, then you’ll unlikely face any image degradation – sharpening a RAW image isn’t necessary as often.”
What is that about? The process of converting analog information into a digital file creates a degree of image degradation. A digital camera’s optical low pass filter alone will soften an image unless you own a Nikon D800E without the low pass filter and I know you don’t because they haven’t shipped yet.
A jpeg image is sharpened in the camera’s processor and is the format that generally doesn’t need any additional sharpening. If it does you can boost the in-camera sharpening level via the camera’s Picture Controls.
Don’t you have this backwards?