Shooting your own large scale product photography may be easier than you think. There is a ton of information on the web about how to photograph small products, but what about the heftier of items like sofas and dining sets? Luckily, photographer Sean Tucker realized this unexplored niche and created a concise and comprehensive guide to shooting large products:
Part one of this three part series outlines the lighting and camera settings needed to create crisp and clean product photography. Tucker includes a lot of great tips and tricks to help create the same professional results but on a budget.
How to Photograph Large Items
- Situate your product on a white surface and preferably against a white wall. The white background is not necessarily used to create a blank surface for your image, but to create a neutral color balance. The white surroundings will protect your product from picking up color when the flashes are set off.
- Start with soft overhead light, like a large soft box on a boomstand. This quality of light creates a beautiful roll off and gradient on your product. If you don’t have the luxury of studio equipment you can easily compensate with a simple speedlight on a stand. Place the stand behind the product and bounce the light off a flat white ceiling.
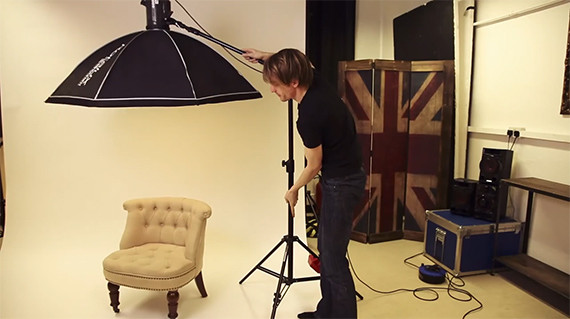
Place your product against white surfaces and use a soft overhead light.
- Use a focal length of 50mm or greater. Tucker suggests using around 70mm. Any focal length above 50mm will minimize distortion.
- Set the f-stop to f/10 or above. You don’t want a shallow depth of field for large product photography–you want to keep everything in sharp focus.
- Use a low ISO and a shutter speed that works with your camera and flash. Tucker suggests around 1/125 on his Canon 5D Mark II—a shutter speed he knows will avoid flash sync issues.
- Take a test shot. Make sure all areas of the product are in correct exposure. The image should show depth and bring out the detail in your product.

Make sure your image has depth, detail, and isn’t over exposed.
- You will need to add fill in lights. Be sure to light all the sides that will be viewed in the image. Point your flash on slight angles to feather the light to create depth. On a budget, speedlights can be used in conjunction with umbrellas or pointed backwards at a piece of white poster board.

Add fill lights to brighten all areas of the product that will be viewed in the image.
- Take another test shot. You may have to play around with the output on your flash, or adjust your f-stop.

The fill lights should create a soft roll-off light that adds depth to your product and showcases it well.
- A helpful little tool for getting the perfect white balance is a grey card. It’s a small card with a block of 50 per cent neutral grey (without coolness or warmth), a block of pure white and a block of pure black. Simply place is on your product and snap one another test shot.

Use a grey card to help obtain perfect white balance.
- To make sure no ambient light is affecting the product, turn off the trigger so no flash fires. After taking a final test shot, if the screen on the back of your camera is totally black then you know that no ambient light is affecting your product.

The various stages of shooting a large scale product.
Now go ahead and snap away at your perfectly lit and totally purchasable product!
Like This Article?
Don't Miss The Next One!
Join over 100,000 photographers of all experience levels who receive our free photography tips and articles to stay current:


This was useful. Can you provide tips on how to photograph a super large painting? Like 8ft tall or more.
Thank you