In order for a picture to come out perfectly, you need to pay attention to all details—not just the ones you want the viewer to focus on, but all of them. You don’t want to leave anything to chance and realize later that you should have done something differently. In this video, Jay P. Morgan focuses on photographing and outlining hair and is useful both when you’re taking the photo and afterwards, when you’re post-processing it:
It’s hard to believe that you’ll replicate what you’ve learned on actual Yetis, but I think it’s equally as applicable on human hair. So, what have we learned? First, we found the best way of photographing if we want to make hair stand out:
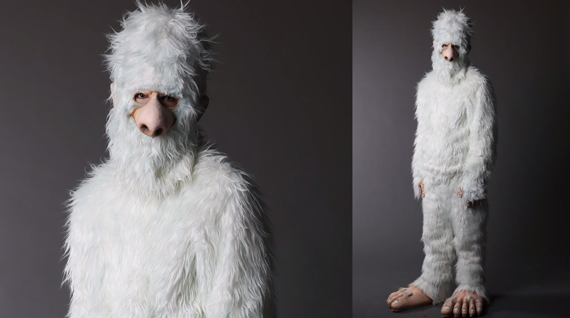
Final shots from the session, without any post-processing. Notice how the light puts the subject into focus, but also separates the hair from the background.
Photographing Hair
- First and foremost, make sure you have crystal clear focus. In the video, Morgan uses a Tamron lens, an f/8 aperture, 1/60 of a second shutter speed, and ISO 100 to have take the Yeti’s shots. Having hair perfectly exposed will make for a much better experience in post-processing.
- Ensure that the background contrasts with the subject’s hair. If you’re shooting a dark-haired subject, make the background color as light as possible, and vice versa.
- Light for separation. In the video, the background and subject were lit in such a way that the subject was successfully separated from the background, making his hair easy to place into focus. By placing three light sources with umbrellas, as well as a trident light on the subject’s head, the perfect lighting was achieved.
While you can take a great picture on your first try, it’s most likely going to need some polish in post-processing. Here are a couple of tips that you can use to take an already awesome photo and make it perfect by cutting a figure from its background and making sure the hair is outlined perfectly.
Outlining Hair in Photoshop
- First, touch up the background and make it uniform throughout the picture.
- Retouch the image of your subject by taking away all imperfections, just like you would with a standard Photoshop edit.
- Use the Quick Selection tool first and outline your subject. Make sure you include all the details you need cut out!
- Create a mask from your selection. By going to Layer Mask Properties you can then refine the mask by clicking on Mask Edge to include the fine details in the edges. Select Decontaminate Colors to eliminate any traces of your background’s colors from the image.
- Check the resulting mask on a white background, a black one, and one that’s a separate color altogether, in order to make sure all the edges are clean.
- Check for areas that contain some bleed from the background and paint the hair manually on those areas in order to make it look natural. After you finish, duplicate the layer and blur it with Gaussian Blur to make it match the surrounding hair. If it’s required, repeat this process once more.

Finished photo, outlined in Photoshop
And that’s all there is to it! Of course, this technique requires practice and patience, but if you keep at it you’ll start improving in no time.
Like This Article?
Don't Miss The Next One!
Join over 100,000 photographers of all experience levels who receive our free photography tips and articles to stay current:


Thanks for the expert hair retouching tips! That has always been a problem for me!