This article is for new Adobe Lightroom users as well as those who already have photographs stored on their computer and are looking for a better approach. Deciding how to store your photographs or improve the way you currently store your photographs requires a little knowledge and a plan. In either case, the end game is the same: creating a file structure that works for you and streamlines your workflow. The purpose of this article is to give you that knowledge and a roadmap to quickly get up to speed. In this article, we will:
- Give you some ways to think about organizing and managing your photographs, so that you can select an approach that works for you based on best practices and personal preferences.
- Provide you with action steps to guide you through the process.
- Give you some examples of how you may use your organizational structure to more effectively manage your workflow.
All of this can seem geeky, but the end result — a streamlined workflow, less time spent in front of the computer, and more time spent behind the camera — is worth the effort. To manage the geek factor, there is a glossary for definitions of a few frequently used technical terms.
File Organization
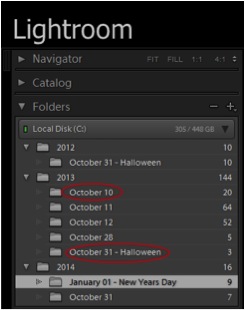
Figure 1: Date-based organization
No two photographers manage their photographs the same way and there is no one combination of organizational structure and folder/file naming convention that works for everyone. Each of us should use a file organizational structure that works for us.
Step 1: Planning your Organizational Structure
Start by thinking about your photography in terms of the subjects you shoot and the approach you are most comfortable with when it comes to saving, storing and finding your photographs.
For instance, if you would like to store and access photographs by the date they were taken, then you will probably want to use a date-based folder structure, and your folders will be named by year, month and day, an example of which is shown in Figure 1. Notice that the folder names in Figure 1 are conventional dates such as “October 10.” There are 13 options for how dates are represented in Lightroom folder names, and you will want to choose the one that works best for you.
A tip for the more organizationally obsessed among us is to name your folders in the form of YYYYMMDD (for example, 20131103 for November 11, 2013), so that they will appear in chronological order when you view them in the file system.
Figure 1 also shows how the rename function can be used to add a subject, (e.g. Halloween) to a date folder name, (Library Tab > Right click on the folder name > Rename > Rename Folder dialog box).

Figure 2: Subject-based organization
If you prefer to organize photographs by subject matter, you will probably want to use a subject-based folder structure in which the folder name describes the subject of the photographs in that folder, as shown in Figure 2.
More advanced users who want to combine the date and subject organizational structures should refer to Step 4.
Whether you choose a date-based or subject-based folder structure, you can also add subject-specific information to your photographs via keywords and change the names of image files during the import process to help you locate them.
In practice, the organizational structure you select is a personal choice since in Lightroom, regardless of which organization structure you choose, with as little as a couple of clicks you can:
- Add keywords
- Rename files
- Sort your folders and photographs by date
Step 2: Build Your Folder Structure and Populate Your Folders with Photographs
Having determined your organizational structure, you are ready to add folders and photographs. If you already have photographs on your computer also see Step 3 – Moving Existing Photographs. To add folders and photographs:

Figure 3: Destination Panel with Date-Based Organizational Structure
- Select a physical location for your photos. To simplify the process, you should put all your photographs in one place. This may be on the internal hard drive of your computer or on an external drive. For the purposes of this article, we will assume you are storing photographs on your internal drive.
- Select an existing directory for your photographs. For example, in Microsoft Windows use C:\Users\[Username]\Pictures or on Mac, use /[Username]/Pictures, where [Username] is your username. Once you select a directory, you can create your own subdirectory, for example, My Pictures
- If you have new photographs to import, open Lightroom, insert the card containing your photographs into your computer, select a source, select the images you want to import, and select Copy New Photographs. In the Destination panel on the right of the screen choose your organizational structure, select (or create) the destination folder, and import your photographs.
It is at this point you select the date-based or subject-based structure you have chosen.
- Date-based: (See Figure 3.) In this example, we are loading 5 photographs into a new folder. Since we have left Into Subfolder unchecked, selected Organize “By date”, and selected one of the 13 available date formats, Lightroom has assigned the date the photographs were taken — in this case October 28 — as the folder name. You can click on the up/down arrows next to the date format box to change date formats.When you click Import, Lightroom will import the photographs into this folder.

Figure 4: Destination Panel with Subject-Based Organizational Structure
- Subject-based: (See Figure 4.) In this case, we want to put all the photographs on a memory card into a new folder called “Flowers.” With My Pictures highlighted, check the box Into Subfolder and enter “Flowers” in the box next to this. In the Organize box, select Into one folder. This new folder is now shown along with the existing folders.
When you click Import, Lightroom will import the selected photographs and copy them to the Flowers folder shown in Figure 5.

Figure 5: Lightroom after adding the Flowers Folder
After completing these steps, you will have:
- Established an organizational framework that is based on your personal preferences and in line with best practices used by many other photographers.
- Created a central repository for all your photographs in one physical location.
- Created a Lightroom catalog for all your photographs and their associated metadata.
- Built the necessary foundation to back-up your work.
- Established the groundwork required to move all your photographs and your Lightroom catalog to a different machine when you upgrade.
Step 3 – Moving Existing Photographs
If you already have photographs on your computer, you can start fresh in a very manageable way without losing anything. You can establish a new organizational structure, add your new photographs and as the need arises and time permits, gradually move older photographs starting with photographs that are important to you, such as your favorites or those you are working on.
- Before making any changes in Lightroom, be sure to back up your current catalog. On Windows, select Edit > Catalog Settings > General > Backup Catalog > When Lightroom Next Exits. On Mac, select Lightroom > Catalog Settings > General > Backup Catalog > When Lightroom Next Exits. Exit and restart Lightroom.
- If your photographs are currently in Lightroom and you simply want to change a folder name to fit your new organizational structure, go to the current folder location and change the folder name within Lightroom. If you then want to re-categorize that new folder or make it a sub-folder of a category, drag and drop that folder within Lightroom.
- If your photographs are currently in Lightroom in relatively disorganized buckets and you want to reassign photographs to several different folders, go to the current folder location, select just the photographs you want to move to a particular folder, and drag and drop them to that new folder location. Repeat until photographs are appropriately relocated.
CAVEAT: It is critical to remember that any such changes should be made from inside Lightroom, and not in the file management system (that is, not in Windows Explorer® or Mac Finder®). If you reorganize your folders inside Lightroom, the program keeps track of your changes and will know where all your photographs are located. If you do it outside Lightroom, you will need to tell Lightroom the new location of your photographs — a very unnecessary step.
For photographs not currently in Lightroom, it is a very good idea to consolidate them first. For example, if you want to bring your old favorites into your new Lightroom catalog then either from inside Lightroom or using the file management system, (Windows Explorer or Mac Finder) go to My Pictures and create a folder such as “Old Favorites”. Using the file management system drag and drop your photographs to move them into the “Old Favorites” folder.
- Once you have completed moving your photographs, you must then import them into Lightroom. Importing will add the selected folders and metadata for your photographs to your Lightroom catalog.
- When you are in Input mode and have selected the photographs, use the options on the top of the screen for importing photographs to add them to your catalog.
- If you are importing photographs from a memory card, use the Copy option to copy them to a new location and add them to the catalog.
- If you have already moved your photographs as describe above, or the photographs are already on your computer and stored in a location where you want them, use the Add option to add them to the catalog without moving them.
As you go through these steps your organizational structure will very quickly take shape.
Step 4 – Combining Date and Subject-Based Organizational Structures

Figure 6: Combined Date-Based and Subject-based Organizational Structures
There are times when you want to combine a date and subject organizational structure, and Lightroom offers us that flexibility.
Building on the example in Step 3.4 above, suppose you have moved your old favorites, are ready to import them into Lightroom using the folder name “Old Favorites,” and want them sorted by the dates the photographs were taken.
In this example, I am importing 170 photographs, (my old favorites) into a new folder as shown in Figure 6.
Checking the box “Into Subfolder” and entering “Old Favorites,” tells Lightroom to create that subject folder. Selecting “By Date” in the Organize box, tells Lightroom to retain the date structure. Selecting a date format, tells Lightroom how dates should look.
When I click Import, Lightroom will import the photographs into this subject folder organized by the date the photographs were taken.For more advanced users, another way to combine date-based and subject-based organizational structures is to name your folders with both date and subject as shown in Figure 7.

Figure 7: Combined Date-Based and Subject-based Organizational Structures
In this example, photographs are stored in folders named by year (for example, 2013) with sub-folders named with both date and subject (for example, 1305-JoshuaTree for photographs shot in May 2013 in Joshua Tree National Park). In this way, you can quickly access a specific subject by shoot date.
Caveat: It is not possible to create a date folder and modify the folder name by adding a subject while importing photographs into Lightroom. You can use the file management system, (Windows Explorer or Mac Finder) to create the folder, load your photographs into the folder and then import them into Lightroom, or you can import your photographs into Lightroom and change the name of the folder, (Library Tab > Right click on the folder name > Rename > Complete Rename Folder dialog box).
Some examples of how an organization structure can help you manage your workflow.
Following are some examples of how using a predetermined organizational structure has streamlined my Lightroom workflow.
Use Case 1: I often shoot more than one location and subject in a day and download my photographs at the end of the day. Previously I downloaded a day’s shooting from the card by subject, but found this took too much time.
Now I start by downloading all of a day’s shooting into one folder. From that folder, I select the photographs related to a specific location or subject and either drag and drop them into an existing folder containing the same subjects, or if I do not already have a folder, create a new folder or sub-folder. For instance, I recently went on a 6-day trip to Sedona, AZ without my computer. When I returned, I created a folder called “Sedona” and imported all of my photographs into that folder. I then quickly went through all of those photographs and selected them by location, (e.g. West Fork Trail, Cathedral Rock, Honanki Ruins) and relocated them into sub-folders with those names. Now with all similar photographs in sub-folders, I am able to quickly compare and select photographs to work on, change file names, add relevant keywords, add GPS, and sync metadata settings.
Use Case 2: While I do most of my work in Lightroom, I occasionally edit photographs in Photoshop, Silver Efex Pro 2, or other tools. When you save an image in another application, that application changes the original file extension from .NEF (Nikon) or .CR2 (Canon) to .PSD, .TIF or .JPG. These new versions are typically stacked with the original RAW photographs. This can get confusing and made it difficult to identify the versions of photographs I was working on.
To solve this problem, I now create a sub-folder called WIP (Work–in-Progress) for each folder I work on, (see Travel > London > WIP in Figure 2 for an example). When I am working on an image, I perform a Save-As at various stages, assign a file name that makes sense to me, and select the particular WIP sub-folder as the destination.
The end result is that my original RAW files are contained in one folder and all of my work-in-process is contained in a separate sub-folder. It is now very easy for me to look at my post-processing, see what steps I performed, and to pick up at any point.
Glossary:
Directory: Information on your computer is organized in a hierarchical structure. At the top of the hierarchy is the root directory. (On Windows, C:\ or on Mac, /.) A directory may itself contain other directories referred to as sub-directories.
Sub-directory: A directory hierarchically below another directory. Sub-directories may be stacked and contain applications, folders, and files that are stored on your computer. For example, In Windows, the subdirectory “My Pictures” mentioned in the article where I store all of my photographs is located in C:\Users\Mike\Pictures\My Pictures.
Folders: In graphical user interfaces such as Windows and the Macintosh® environment, a folder is an object that can contain multiple photographs. For example, the folder October 10 in Figure 1 and the folder London in Figure 2 contain photographs relevant to that date or to that subject.
Sub-folder: A folder hierarchically below another folder, e.g. the subfolder WIP in the folder London in Figure 2.
File and Filename: Every image is a file and must have a file name. A file name is comprised of a name and an extension, for example, “Flowers_1234.jpg.” “Flowers_1234” is the file name, and “jpg” is the file extension. Within a single folder filenames must be unique, so it is a good idea to leave the original image number assigned by your camera in the file name as shown, (_1234). The file extension defines the type of file. In photography, we are mainly interested in types with the extensions .NEF (Nikon), .CR2 (Canon), .PSD (Photoshop), .TIF (Tagged Image File Format, a common way of storing high resolution images without compression), .JPG (Joint Photographic Expert Group, a common way of storing images with some lossy compression), .CMYK, and .PDF (Portable Document Format, a way of storing documents independent of application software, hardware, and operating system).
Metadata: Refers to data about the content of your photographs. Select an image in the Library module and click on Metadata to see its metadata.
Catalog as used by Adobe Lightroom: When you launch Lightroom and import photos, Lightroom creates a catalog file (Lightroom Catalog.lrcat). The catalog does not contain your photos, but it does keep track of your photos and the information about them (the metadata). Your actual photographs are located in a separate directory in your file system such as My Pictures. Most people keep all their photos in one catalog. It is important to back-up your catalog periodically. On Windows, Edit > Catalog Settings > General > Back up catalog. On Mac, Lightroom > Catalog Settings > General > Back up catalog.
Import as used by Adobe Lightroom: You must import photos into the Lightroom catalog to begin working with them in Lightroom. Importing tells Lightroom where photos in the catalog are located. During import, you can choose either to move or copy the photo files into a specific folder. As photos are imported, you can rename them, apply Develop module adjustments, embed metadata, apply keywords, and even back up the original photos to a different folder.
About Mike Watson: Mike Watson has an extensive and varied background in consulting, business, operations and technology. He’s most likely to be found these days behind a camera, or processing his photos in Lightroom and Photoshop and he shows his work on http://www.flickr.com/photos/mikemwatson/.
About CJ Glynn: A Silicon Valley veteran, CJ Glynn is currently Chief Marketing Officer at Fusion, the world’s first smartphone-controlled, LED-based smartband that responds to music and motion. When not hawking wearable technology, CJ is likely to be capturing natural light landscape, travel and commercial photographs, which he shows on http://www.flickr.com/photos/cjglynn/.
Like This Article?
Don't Miss The Next One!
Join over 100,000 photographers of all experience levels who receive our free photography tips and articles to stay current:


Hi CJ and Mike,
Thank you for this article.
Before buying LR, I have already organised my photos in my external hard drives by year/dates and events. Some of the latest sets are on my PC organised in the same way.
Some of these photos are old ones – (1) scanned from films and (2) old Photos. Meta data of these sets will not have the dates, camera and other information.
Searched the net to find information as to how to use these photos in LR and find your article. It looks like this article has all the information I need.
I do not wish to move or copy the photos from where they are now. I will read the article again and start using LR.
Thanks again.
NB – I could not find the date for the article and the comments
Thanks you so much for this article guys. I switched to a mac after years of PC and windows and took the opportunity to subscribe to LR too. I still manage my files the PC way and import to LR on occasion. I have files everywhere now, and duplicates, don’t even ask me about duplicates! I’m a pro photographer so I have a lot of files but i’m going to use this article to start over as from today and organise all my old stuff through LR as we go along. Thanks for putting together such an easily understood article.
Thanks Chris – I’m happy you found this article and also found it useful.
You may also want to check out another article I wrote on Digital Asset Management in Lightroom as a follow-on to this article. It is called
“Organize and Find Your Images in Adobe Lightroom
Just the DAM Basics” and is available at http://photo.net/learn/digtal-photography-workflow/lightroom/just-the-dam-basics/
It dives into more very useful and easy to apply Lightroom functionality, and augments this article.
Thank you both so much! I can’t thank you enough for your detailed explanation and responses!
Mike and CJ, thank you both so so much for the helpful information you provided. CJ, you said after LR has processing my RAW files, I can move them into iPhoto. Do you have step by step on how I can do that. I really would like to have certain pictures that have been processed in LR available on my Apple devices, as you mentioned.
Thank you again!
Jaclyn: Here are the steps you would take to export your post-porcessed images from Lightroom as JPGs and import them into iPhoto.
1) In LIghtroom grid view, select the images you wish to export
2) In Lightroom, select File > Export to bring up the Export dialog box. Here you will see many options for your export. They are:
Export Location:
For Export To:, you can select Specific Folder, Choose a Folder Later, or Same Folder as Original Photo. These options do what they sound like they do. Specific Folder allows you to specify which folder you would like to export your post-porcessed images to. Choose a Folder Later lets you chose a specific folder for the export designation later in the export process. Same Folder as Original Photo puts the exported images in the same folder as the original (presumably RAW) file.
File Naming:
If you wish to rename your image files on export, you can click the checkbox next to Rename To: and then select an option from the drop down menu.
Video:
Since we’re talking about images, I will not cover this tab.
File Settings:
Select an Image Format (JPG, TIFF, PSD, DNG). For your purposes, you will select JPG
Select Quality. Qaulity refers to the quality of the image you will export, ranging from 0 to 100. A lower number corresponds to a lower image quality and a smaller file size; a larger number corresponds to a higher image quality and a larger file size. You will need to adjust Image Quality based on your preferences.
Color Space: sRGB, Adobe RGB, ProPhoto RGB. The color space is an abstract mathematical model describing the way colors can be represented. sRGB is the smallest color space, ProPhoto RGB is the largest color space. IF you were printing your photos, you might select ProPhotoRGB, but for your purposes, I recommend you select sRGB, as it will result in a smaller file size but sufficient quality to view your photos on your iDevices.
Image Sizing:
Here you can resize your images. Based on your requirements, I suggest you leave this option alone.
Output Sharpening:
Here you can specify the amount of sharpening that Lightroom will perform on export. Based on your requirements, I recommend you choose Sharpen For: Screen with Amount: Low.
Metadata:
Here you can specify what metadata (see original article for a definition) Lightroom will export with each image. You can select All Metadata, if you want your JPG files to include all the metadata that your images have, or if you wish to, you can tell Lightroom to remove all metadata (some people do this for privacy reasons).
3) Once you have selected values for all the above options, you click Export. Lightroom will then export your post-processed images (presumably as JPGs in your case) into the folder you specified.
To get your post-processed JPGs into iPhoto, start iPhoto and select File > Import To Library to bring up the import dialog box. Here you will navigate to the folder to which you told Lightroom to export your post-porcessed images and select the images you wish to import into iPhoto.
Voila, you are done and your post-porcessed JPG images will be available in iPhoto and, through the magic of Apple’s photostream, to all your iDevices.
As with everything Adobe, there is another way to export your photos and make them available to another program or service: it’s called Publish Services, but sadly that is beyond the scope of this answer and may be fodder for another article altogether.
Jaclyn: Mike points out that there are two Adobe Lightroom plugins that may help you with your workflow. You can access the following Lightroom plugins on the Adobe Exchange (http://www.adobe.com/cfusion/exchange/index.cfm):
– iPhotoPublish: http://www.adobe.com/cfusion/exchange/index.cfm?event=extensionDetail&extid=2608076
– iPhotoExportService: http://www.adobe.com/cfusion/exchange/index.cfm?event=extensionDetail&extid=2395525
Neither Mike nor I have direct experience with either of these plugins, so we cannot recommend them positively or negatively. However, you may wish to read about Lightroom plugins on LIghtStalking (http://www.lightstalking.com/how-to-install-a-lightroom-plugin) and give them a try.
Hi, this is really helpful. I just got Lightroom 5 and will be transitioning from iPhoto. Im so used to iPhoto and don’t really know how to go about using the catalog system in LR. Ideally I would like to import the pictures, edit in LR and then once I change the edited files to jpeg, move back into iPhoto for organization. Is that possible? Any recommendations on creating the folders for LR? And lastly, how do I go about importing the files from my SLR? I used to import directly into iPhoto. thanks a lot!
Jaclyn:
You have made a very good decision to invest in Lightroom which has at least two major functions – post processing and cataloging. You seem to be convinced on post processing but not on cataloging. I’m going to answer your questions and then make a recommendation.
1. First you need to understand that when you use Lightroom all information about your photographs is stored in one place – in the Lightroom catalog. Your actual photographs are stored in a separate place of your choosing as described in the article and Lightroom keeps track of exactly where they are stored. To process images using Lightroom they must be in the LR catalog. This separation initially confuses a lot of people but it is a great design.
2. How do I go about importing the files from my SLR? First, open Lightroom and edit your preferences as follows: Edit > Preferences > General > and apply a check-mark to the box labeled “show import dialog when a memory card is detected” and click OK. Then use whatever approach you have been using to connect the memory card containing your photographs to your computer. This may be either by directly connecting your device such as your camera or smartphone to your computer or by using a memory card reader. When you do this and if Lightroom is not open it should now automatically open. If Lightroom is open you will be asked to select a source to import from – select the device or memory card reader as appropriate. Finally, use the import function to import directly into the Lightroom catalog. Follow the step-by-step guidelines in my article regarding directory and folders for the next steps.
3. Recommendations on creating the folders for LR. This is part of the import process and is covered in the article.
4. Using the catalog system in LR. You really do not use the catalog system as such – it works for you. You make changes to your photographs (e.g. moving them) and the catalog keeps track of those changes SO LONG AS THE CHANGES ARE PERFORMED in Lightroom and nowhere else. This is covered in the article.
You say ideally you would like to import the pictures, edit in LR and then once you have changed the edited files to jpeg, move back into iPhoto for organization – and is this possible. Yes it is possible but not recommended. I discussed this with two iphoto experts and we all agreed – this would inevitably lead to a lot of unnecessary work and quickly lead to confusion.
The approach I would recommend it to learn more about Lightroom, especially the import and catalog function. You can either buy a book or subscribe to one of the very good online services which very carefully explain all of this in great detail, such as Kelby Training (http://kelbytraining.com/?s=lightroom§ion=course) or Lynda.com (http://www.lynda.com/Lightroom-training-tutorials/450-0.html).
Jaclyn: Let me add to my esteemed colleague’s informative response.
Mike is right in everything he says above: Lightroom provides both post-processing and cataloging, and it has the ability to export images.
If your desire is to use iPhoto to store JPGs of your post-processed images so that you benefit from Apple’s photostream that makes your images immediately available on all your iDevices, you can do so, although it will take a couple additional steps. Once you have imported your images (presumably RAW files, and if you are not shooting RAW, please start immediately) from your camera’s memeory card into Lightroom and completed your post-processing, you can use Lightroom to export your processed images as JPGs and store them in your computer’s file system. Once stored in the file system, you can them import your post-processed JPG images into iPhoto.
Thank you Nancy: As always there are options but I’m going to answer the question you asked in the context of a new external hard drive since it seems you have a new one already. It is a good idea to use this external drive exclusively for your photographs. Also, it is a good practice to back up your existing Lightroom Catalog before you do anything like this.
1. Connect your new PC compatible external hard drive to your computer following the manufacturer’s instructions. I trust it has enough capacity for the future – at least 1 or 3 Terabytes (TB). When successful this external drive should now be visible in your file management system, (Windows Explorer or Mac Finder).
2. The external drive should now also be visible to you in Lightroom in the Library module. Within Library, the Navigate panel on the left side has 4 major headings. These are Catalog, Folders, Collections and Publish Services. Collapse them all to get rid of the clutter and then click on > Folders to expand it. You should now see your Local Disk (C:) and below it your new external drive, with a manufacturers drive name assigned to it. Click on the black arrow to the right of the drive name to expand it. Right click on the external hard drive name and select “Create a folder inside \\[Your new Drive name]”. This new folder can be name anything you like such as My Photos or Nancy’s Photos. You can also do this in your file management system.
3. You are now ready to move your existing folders and files into this new folder using the techniques described in Step 3. In addition, in step 2 we say “for the purposes of this article, we will assume you are storing photographs on your internal drive, your C:\ drive”. All you really need to do is replace the word “internal” with the word “external” and you should be ok.
4. As you move (drag and drop) your photograph folders from your now almost full computer to your new external drive you will free up space on your computer and see your folder structure grow on the external drive. I recommend doing this one file folder at a time. This takes a little longer but if there are any issues you can address them as they occur. The good news is that as you do this within Lightroom the program will automatically update your catalog so it knows where all your photographs are.
For my part I keep just active images on my PC – images I am working on. Everything else is on my external drive. When I want to go back and work on them I quickly move them from the External drive back to my PC. In large part this depends on the speed of the connection between your PC and your external drive, and whether or not they are connected at the time.
Hope this helps – good luck.
Informative article. Can you tell me, please how to back up my files after they have already been uploaded to Lightroom. I have years of files that I want to back up on a new external drive and can’t figure out how to do it and the computer is almost full.