When using camera flash while photographing your pets, you’ve probably noticed that their eyes get color casts akin to red eye in humans. If you try to fix this in post-production the same way as you would fix human red eye, Photoshop will just desaturate and darken the area. The eyes will look washed out and awkward. That’s why Glyn Dewis decided to show everybody how to fix pet eye properly:
The procedure is quite simple, actually.
Fix Pet Eye Step-by-Step
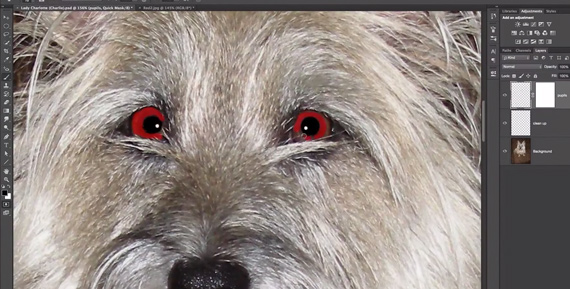
1. Clear up all debris that is near or in the pupil.
2. Select the pupils (the parts which need to be black) using any way that suits you, with a touch of feathering so there are no hard edges. Dewis uses the elliptical marquee tool, which is probably the fastest technique.
3. Fill the selections with black.

Fill the selected pupils with black.
4. After you have your selections set and filled properly, you need to bring back the highlights which are hidden below. You can do this by activating a layer mask, setting your layer to lower opacity (in order to see where the highlights are) and masking out the black using a black brush every place where you see a highlight.
5. Now the outer part of the eye usually needs a tad bit of contrast. Select the color part of the eye and make an adjustment layer which will affect only that area. Increase the contrast by using levels or curves.
Select the irises.
6. In order to avoid flat black circles, you’ll need to add some curvature. Dewis uses fake window lights by drawing four white rectangles to mimic window light. Then he warps them to make them look curved and blends them well with the eye.
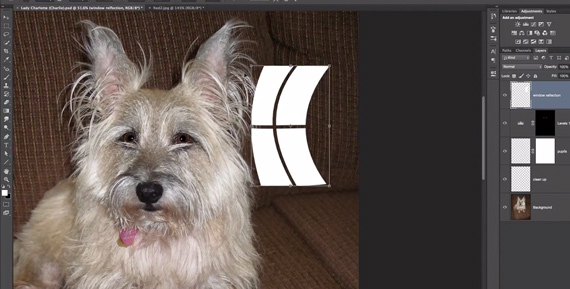
Create fake window catchlights.

Resize and position the fake window catchlights.
7. Finally, to make everything sit right with the picture, you need to mimic the noise in the rest of the image. There are many ways to do this, so just pick the one you like best and mimic the noise levels as close as possible.

Add noise to the eyes.
By following these steps, your pet’s eyes should look just as cute and full of life as they do in person.
Like This Article?
Don't Miss The Next One!
Join over 100,000 photographers of all experience levels who receive our free photography tips and articles to stay current:


love Glyn Dewis … thanks for sharing!