It’s amazing what you can do with a camera. Light can be captured in different ways, and this opens up many possibilities for the keen photographer. Creating your own shaped bokeh is a fun and exciting way of shaping light as it enters the camera, and it leads to spectacular results.
Bokeh refers to the out-of-focus or blurry regions in a photo that occur outside the depth of field. This is especially evident when you have small background highlights that create high contrast.

Photo by ruben alexander; ISO 200, f/1.8, 1.6-second exposure.
Taking this concept, you can change the shape of your bokeh by manipulating the lens. You can easily master this cool camera trick by following these five steps:
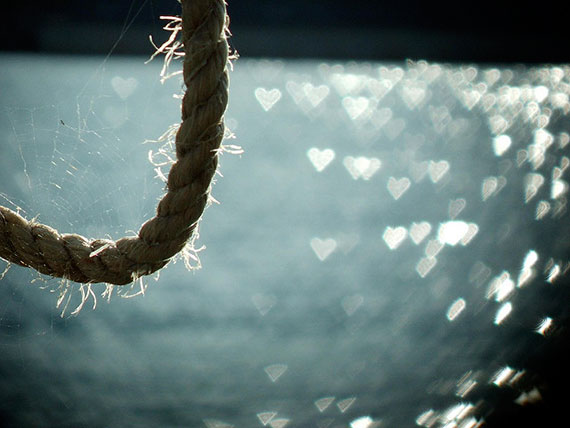
Photo by Smallest Forest; ISO 64, f/3.1, 1/420-second exposure.
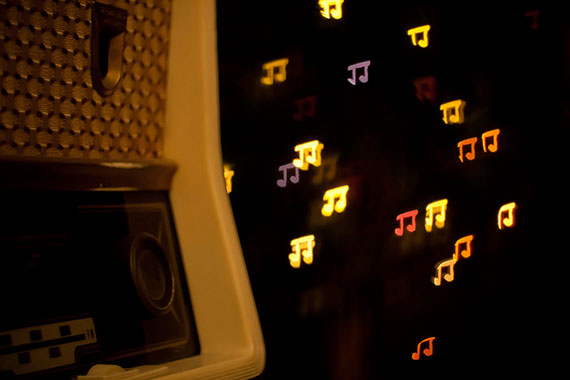
Photo by Francesca Cappa; ISO 800, f/1.8, 1/20-second exposure.
- You’ll need dark colored construction paper, preferably black. Cut a strip of paper with a length that will fit around the lens of your DSLR camera. It’s best to use a lens with a wide aperture to create bokeh. Wrap the strip of paper around the outside of your lens, forming a cylinder, and hold it together with tape.
- Next, you need a circle-shaped piece of the black paper to form the cap on the paper tube, which will fit over your lens. To do this, you can measure the lens of your camera and draw the circle on the paper with a compass set to half the lens width. Or, you can get the paper tube you made, place it on the paper, and trace around it to get your circle.
- Cut out the circle and use a paper punch to make a custom shape in the middle of the circle. If you don’t have a custom paper punch, you can use an X-Acto knife to cut out the shape you want. The shape should be between 1/2 and 3/4 of an inch. It can be anything–a heart, cloud, star, you name it. Make as many circles as you want with different cut out shapes. Some will work better than others, so you’ll need to experiment.
- Prepare to place the paper tube and circle over the lens. Putting a strip of tape along one edge of the tube will make it easier for you to remove and change the shape cutouts. You should tape the circle to the tube so that it forms a cap that will fit nicely over your lens.
- You are ready to shoot! If you want to make the best bokeh, make sure the focused subject is positioned close to the camera. Bright background highlights should be at a distance. The background can be any tiny points of light, such as sunlight between leaves or Christmas lights. Set your camera to full manual or aperture priority mode, and make sure your aperture is as wide as possible.
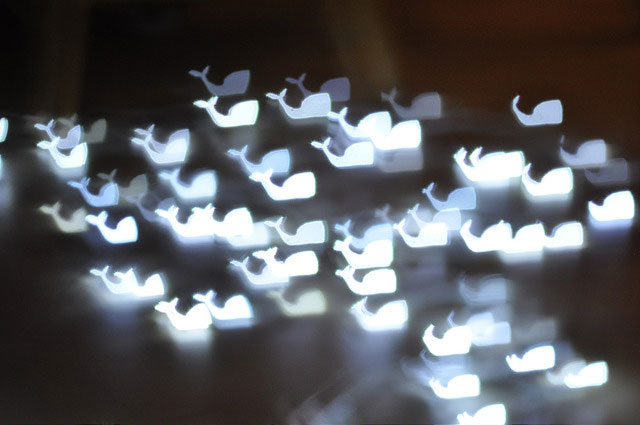
Photo by Hannah Morse; ISO 800, f/2.8, 1-30-second exposure.
With your own custom shaped bokeh, you can make awesome and creative images. This useful and simple photo trick is just about manipulating the aesthetic blur to create something magical in your photos.
About the Author:
Swee Shiong Chong writes for sgeastphoto, a photography blog on techniques and equipment that is used in creating all types of photography from around the world.
This is a how-to video on creating customized shapes out of your out-of-focus highlights, also known as bokeh.
Like This Article?
Don't Miss The Next One!
Join over 100,000 photographers of all experience levels who receive our free photography tips and articles to stay current:


Another approach I have tried is to make a black and white photograph on a transparency and use that to create bokeh. This allows you (for instance) to make bokeh of a face, say, which to my mind is a little more interesting than a heart. For instance the use of the brides face in a picture of a groom would give the appearance of him seeing her everywhere.
I don’t understand how you will get a regular sized photo if you are only using the size of the cut-out
Bil — absolutely correct about Bill Stockwell. Learned this little technique when I was working with Al Gilbert. The thing we used most was a simple slim piece of tape on a UV filter and then rotate the filter to make the pattern create motion in the image based upon the direction of motion in the subject area and how the photographer wanted to direct the viewer’s eye. Another terminology was TOLS device or T ape O n L en S. Until moving to the realm of digital photography I had not heard the term “bokeh” but we simply referred to “circles of confusion”. So it is, what goes around, comes around. Sometimes we would use other shapes when doing candlelight images to turn the flames into hearts etc.
For ap
it also works with a nikon box
I have tried this before unsuccessfully. What I can’t figure out is how to focus on my subject when I’m only looking through this tiny little heart (or star or whatever shape) shaped hole.
Please help!
I love the tutorial!
Hey,
Thanks for this wonderful tip. I want to try creating these during this holiday season. One question: should it be a black hard paper or any other color would do, as long as I have it close to the lens?
Also, I just wanted to make sure it would work with the Nikkor 35mm 1.8G lens…
Thanks!!
And if you don’t want to make your bokeh tool, you can purchase the bokeh cover for your lens here: http://photojojo.com/store/awesomeness/bokeh-kit/
Happy Bokeh!!!
Come on AP! no need to be so harsh. Here’s a summary for you:
1. Wrap some construction paper around your lens. If it doesn’t wrap easily, you’re doing it the wrong way. Try until you can see a nice round circle around the lens.
2. Cut a circle the same size as the hole of the paper tube that you already did. Use the tube as a stencil. If the shape that comes out looks like a rectangle, you’re doing it wrong. Rotate the tube and try again until you can make a circle.
3. Cut a hole in the middle of that circle in any shape you want. Make sure it’s not longer than your thumb. If you need both hands to measure, borrow someone else’s thumb.
4. Tape that circle to the top of your paper tube and place the tube on top of the lens. If the tube falls off when you point the camera, that’s because your putting the wrong end in. Turn the tube around and try again.
5. Shoot with wide aperture
Notes:
a. If you can’t get past step 2, it’s ok.. At least it’ll keep you entertained for a few hours.
b. DO NOT CUT THE BORROWED THUMB OFF THE PERSON. They can come with you and show the size. Actually, now that they’re with you, show them this article. They will help you with the craft.
There is not enough clarity in your article, is confusing. In your point No 1: What are you talking about?
The length: are you making reference to the diameter of the camera lens, or the radio of the lens, or the length from where the lens is attached to the camera to the end?
Point No 2 the same problem: are you talking about the diameter of the camera lens or the radio?
Finally: Is better to understand your article if you use the right terminology, and USE A DIAGRAM please!!!, It will be a lot easier to visualize it, instead of many pictures. One will be enough.
Try again; I think it can be a more interesting and productive article.
Sorry to say this to you: but as a writer you are a disaster; I hope your are not a such, as a photographer.
Thanks.
I was doing what is now known as “Bokeh” in the 70s. It was taught by Bill Stockwell, a renowned wedding photographer and instructor, and I used it often with images I cut out to photograph brides in candlelight. They were amazed at the candle flames emitting hearts.
I use an extender tube for some of my lens attachments. Do you think this wold work as well as a paper tube? Canon Powershot S5. Of course you can always use Brokeh brushes or use Smart Photo Editor.