HDR how? This is a simple how-to HDR tutorial to help you create amazing HDR photographs that make viewers say, “Wow!” When I saw my first HDR photo, I just had to find out how to take HDR photos, and how to process them. What I now know is that everyone can take an impressive looking HDR photo. Follow these easy steps and you can be creating HDR masterpieces today.
What is HDR photography?
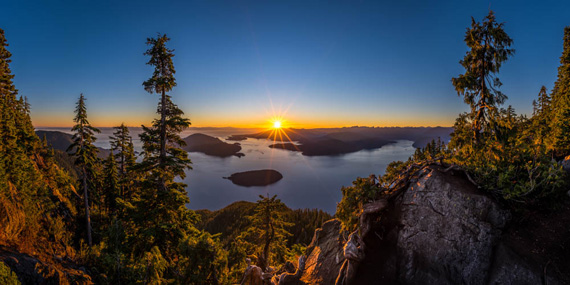
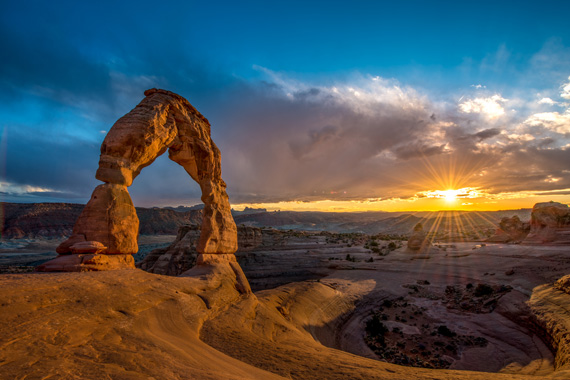
HDR stands for High Dynamic Range. It result from the processing of one image, or even better, a series of images with different exposures. HDR photographs actually compress the amount of light in a photograph so it can be displayed in print or on your computer. For example, have you ever taken a photo directly into a sunset and noticed that the foreground is too dark to see? This is because your camera is adjusting its light meter for the bright sunset, and as a result the foreground becomes silhouetted. But with HDR photography, both the foreground and bright background will be properly exposed resulting in an amazing picture.
HDR tutorial – Step one – take three photos
Start by taking three photos at different lighting levels. You can do this very easily if your camera has a bracketing, or multiple exposure setting. Set the bracketing to 2 EV increments so that the first photo you take will be too dark, the second photo will be correctly exposed, and the third photo will be too light, or, over exposed. If your camera does not have a bracketing setting, you can manually adjust the aperture or go into the menu settings and manually adjust the exposure value (EV) settings between shots.
To be clear, the first photo should be taken at minus two EV, the second photo should be zero EV, and the third photo should be plus two EV. But, there is a key point here. Your camera should be set to aperture priority if you have this setting. This is usually denoted by an “A” on the camera. This means that your aperture won’t change while you take the three photos which would result in different depths of field and a blurry HDR image. (Only your shutter speed will change across the three images.) And finally, ensure your ISO is set to your lowest setting to eliminate noise in the finished HDR image. This means an ISO setting of 100, and may also mean your resulting shutter speed is going to be a long one. But if you have a tripod, this shouldn’t be an issue.
To summarize:
- Set your ISO to its lowest setting
- Use aperture priority mode
- Set exposure bracketing (AEB) to take three frames at two EV increments, or five at one EV increments.
- Use a tripod if at all possible

Of course, you don’t want your camera to move in between shots so a tripod should be used. Having said that, I have taken many good HDR settings with my camera hand-held. To do this you need to hold your camera rock solid still and have your shutter set to a rapid fire mode so all you have to do is hold down the shutter release to take the three shots. Some HDR photos are taken with five or more frames instead of three. If your camera’s bracketing mode only allows you to take photos with one EV increments, then you will want to take five photos. If you can set it for two EV increments, then you only need to take three photos.
Trust me on this, three frames are all you need for the vast majority of high dynamic range settings. You may get a slightly enhanced tonal range with five shots, but you need to know in advance that five photos take much more processing time and you will find yourself sitting in front of your computer for long periods of time waiting for your HDR photo to render. Bottom line: three frames at two EV increments are all you need the majority of the time.
I shoot all my photos in RAW. If you don’t shoot in RAW, then it is high time you started. RAW photos are like a film negative. They contain so much more light information than a jpg image which allows you to make incredible adjustments to the shadows and highlights, and fix errors in exposure that would never be possible with a jpg.

Step two – upload your photos
The next step is to upload your photos into your computer and save them on your hard drive.
Now it is time to process them, and in order to do that you are going to need a piece of software that specializes in the processing of HDR photos.
I have searched far and wide for the best and most cost effective HDR software, and by far the best I have found is Photomatix Pro.
Photomatix Pro can also be installed as a plug in for Lightroom and Photoshop. I have tried both, and I recommend installing the stand-alone program instead of using it as a plug in. The stand-alone program is much simpler to install and use in my opinion. And lets face it, when you are learning about new software, it pays to keep things simple.
Once you have installed Photomatix Pro, please come back here and keep going through this tutorial.
If you shoot your photos in RAW, it is recommended you convert them into jpg or tiff files first. I didn’t know this for the longest time, and was importing my RAW photo files directly into Photomatix Pro for processing into an HDR image. But Photomatix recommends that you first convert your images to jpg or tiff using your favorite photo processing software such as Photoshop or Lightroom, and then import the converted files directly into Photomatix Pro. This is because noise in your finished HDR image will be greatly reduced if you create the HDR image using jpg or tiff files instead of with RAW files.

But there is a but here… if you have taken a photo of moving subject, then you can easily create a pseudo HDR image using one RAW file. It is incredibly easy to do, and again, requires only one RAW file. This is your easiest solution to create an HDR photo of moving subjects, but because it will only be a pseudo HDR image, the finished product will not contain the broad dynamic range that a conventional three image HDR image will.
Using Photomatix Pro
Start by opening the program. A box will appear. Click “Generate HDR image”. Select the three or five images you took using bracketing.
A second box will open. I always select “Align source images”, “By matching features.” This is a neat feature that will allign all three or five images so that slight imperfections in the framing will be compensated for. I find that even if I take my photos on a tripod, there is always a tiny shift that occurs between shots. Aligning the source images by matching features will line up all your frames perfectly.
I also tick “Reduce chromatic aberrations” and “Reduce noise”.

Next, if you have any objects that were moving between your three shots, you will need to tick “Attempt to reduce ghosting artifacts”, “Background movements.” You will be suprised how much a small breeze can move grass or foliage which will result in a blurry HDR image if you don’t tick this box. However, this feature will not be able to fix significant movement between frames.
Keep the tone curve of color profile on the default setting, and click OK. Now the software starts to work its magic. This might take a minute, or could take five minutes. It really depends on your computer’s processer, the number of images, and the size of the images. Once it has been processed, a button appears that says “Tone mapping”. Click it. This is where the real magic begins.
About the Author:
Tim Shields is a Vancouver based landscape photographer. He specializes in ultra high resolution panorama photos suitable for printing in very large formats of eight feet wide and beyond. He has won nine photographic distinctions in the 2014 and 2016 Epson International Pano Awards.
Like This Article?
Don't Miss The Next One!
Join over 100,000 photographers of all experience levels who receive our free photography tips and articles to stay current:


This is so confusing,
I think shoot in Manual setting for the correct creative exposure you want
and use the “exposure compensation” -4, -2, 0, 2+, 4+ to take 5 images.
Shutter speed will change. Aperture will not when bracketing in aperture priority mode.
Actually besides photomatrix, still got any good and free photoshop to use for *HDR. Which shutter speed is recommended to use 1/? or…….. Pls reply ASAP
Simply very good information provide by you..great work..appreciate..
Very informative article thanks for sharing your knowledge.
The idea is to hold aperture constant for all of the images so there aren’t any depth of field variations that might cause the final combined image to look odd. — Carl.
I red your article and I finally purchased the non “pro ” version of the photomatix software (it was a lot cheaper)
I’m wondering if I’m loosing too much and should I upgrade ?
Puddi is right. The author mispoke. Changing aperature would change focal depth of field – bad. Hence the use of a tripod for camera shake due to increased open shutter time.
It is confusing that you should shoot RAW and covert to jpg? I can understand that if your computer was slow it would take some time to render in RAW but I think most of us would rather have a great shot and just wait a few more minutes. Any newer CPU should make quick work out of any image processing now.
Thanks for the article. I’m going to give this a try. I’ve seen some incredible HDR images.
The article does not make sense in two points: Why should I WANT a blurred image (which is what the author wants me to get by changing the aperture, NOT the shutter speed – he clearly states that by doing it his way I will get a blurred image, which is not what I want)? Second he points out that jpegs give you more freedom at adjusting light, contrast etc, while he seems to mean that RAW files do that. This second point may just be “blurry use of written language”, but it should have been edited anyway.
You can get amazing Hdr Photos with just one jpg picture and the hdr setting in photoshop
Can you do this with the LightRoom “Enfuse” plugin?
Hi, I have a question about shooting in RAW. You say to convert files to JPEG or TIFF prior to importing to Photomatix. Wouldn’t it be better to just capture the images in JPEG initially if i’m going to creat an HDR image?
Thanks for you clarification.
Tanya
Yes, when you’re bracketing shots, shoot in Aperature Priority mode, and the camera will shift the shutter speed for the 3 shots you’re taking. OR, if you shoot in Manual mode, using auto exposure bracketing, the camera will also will shift the shutter speed for the 3 shots so you can merge them together in Photomatix. You would never use Shutter Priority mode in bracketing shots for HDR. That would change the aperature and everything would end up fuzzy in Photomatix.
I have a canon 60D. When I shoot in shutter priority, the aperture will change from picture to picture. When I shoot in aperture priority, the shutter speed changes. When I shoot in manual, it also shoots at DIFFERENT shutter speeds. It will shoot at 1/125, 1/30, and 1/500. When reviewing the photos, it says nothing about one being +2 or -2 either, while it does in av and tv. Is that Canon’s way of doing it in manual?
Hey there,
Photomatrix Pro seems to be PC software only. Does anyone know if there is a version for Mac or equivalent software for Mac users?
Thanks
Actually in aperture priority mode, the camera “does” change the shutter speed. It’s changes the shutter speed when you change aperture to correct the exposure for the selected aperture. Sorry I just had to clear that up and it just logically seems like you would want to shoot in shutter priority or fully manual. If you don’t want the aperture to change, then the only way is fully manual. Think about it, even in shutter mode, the camera is going to adjust aperture each time you change shutter settings. I’ve never taken and HDR image yet but the only way from keeping the aperture fixed at different exposures is to shoot fully manual. At least this is the case with most SLR style cameras. Not sure about point and shoots.
In a word: FANTASTIC.
Tim’s explanation was right on and very easy to understand and follow through.
The author is wrong. Do not change your aperture, only the shutter speed. You don’t want your depth of field to be altered between exposures- it will blur the final image.
I was surprised and honored to have 2 of my images used in your article. Thanks for including my work and enjoy!
Celebrate life, Debra
Thank you for the great information. Ive been reading alot about HDR Photography but no one has explained it like this. :) Will enjoy trying to learn this new technique!
Thanks Tim for the wonderfully simple explanations. I am a D-SLR beginner; well all one year of it by now. I am going for the Photomatrix.
Tiberman – Mauritius
Yea what Puddi said. I’m confused
“This means that your shutter speed won’t change while you take the three photos ….”
That should say “aperture won’t change”, shouldn’t it?
Nice tutorial!
i believe he does mean shutter speed, the aperture is the increasing -2 +0 +2 hence why it becomes over exposed