It’s many a photographer’s dream come true to work on an assignment involving a Star Wars theme. The sight of Jedi knights fighting the evil forces is always an exciting thing to watch on screen, and it’s even more fun when you can recreate one of these scenes yourself:
First, a few words on camera settings. The shutter speed needs to be set to a fast 1/800 of a second to freeze the movement of the protagonists. Plus, as PhotographyTV explains the camera should be set to continuous burst mode. That should give you enough frames to work with when you begin post-processing.
To create the light saber effect in Photoshop, follow these steps:
- Open your image in Photoshop.
- Copy the layer (Control + J).
- Turn the new layer completely black by dialing down the Hue / Saturation. Create a Hue / Saturation adjustment layer. Simply drag the Lightness slider all the way to the left.
- Merge the adjustment layer (Control + E).
- Switch the blending mode to Screen. This will allow you to paint over your lightsaber.
- Now to create the glowing lightsaber. Use the Brush tool. Take a medium sized brush with medium hardness.
- It is very important that the lightsaber is absolutely straight. Click on the first point on the lightsaber and then hold down the Shift key and click the second point.
- Repeat this until you have a straight lightsaber.
- Make three more copy layers of the lightsaber
- Go to the top layer and put a blur using Gaussian Blur. Use about 5 pixels radius.

applying the blur tool to bring on the lightsaber effect
- Repeat the process on the next layer; this time select a 15 pixel radius.
- Repeat the process with 35 pixel and the final layer with 75 pixels.

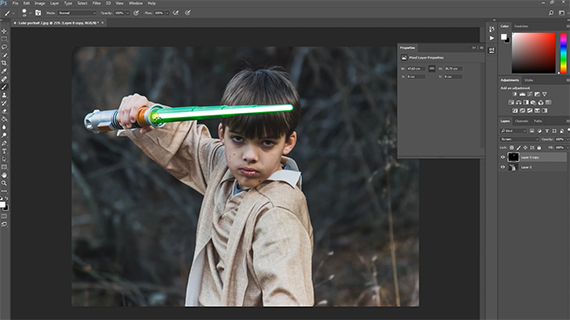
light saber before color balance adjustment
- Use a Color Balance adjustment layer and give the image a green tinge. Don’t forget to activate the clipping mask. This will ensure that only the lightsaber is affected.

- The final task is to produce some green illumination across the face, clothing, and hand of the young Luke Skywalker. This is done in the same way as step # 13, except now it needs to affect only the highlights.
- Use a black mask to hide the effects of the green color balance.
- Take a soft brush and paint over the areas where you need the green light effect.

And, you’re done!


Try this out and show us your shots!
Like This Article?
Don't Miss The Next One!
Join over 100,000 photographers of all experience levels who receive our free photography tips and articles to stay current:


Leave a Reply