Celebrated photographer Karl Taylor takes us through the entire construction process of an infinity cove for his new studio. Now, if you’re wondering what an infinity cove is, take a look at the video below. It’s a white background which appears infinite in the image because of the perfect smooth surface of the wall and the floor that blends together, thus creating an illusion of infinity. It works amazingly well for professional portraits, fashion shoots, and anything else that you may come up with:
The first stage of construction involved putting up the studwork. Plywood preformed curves were then nailed on to the bottom of the studwork. Next came the lattice work, the complicated curved framework made of plyboard that blended the two sides and the floor in one smooth curve.
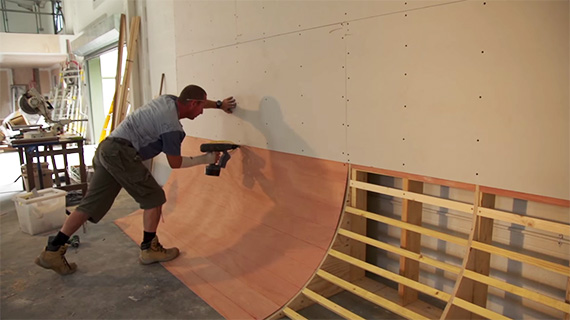
Flexible plyboard being screwed on to the preformed plywood curves
Plasterboard was then nailed on to the studwork. The curved latticework and the plywood curves couldn’t be covered with plasterboard as this material can’t be bent. Thus, sheets of flexible plywood were used to cover these areas.

Latticework covered by flexible plyboard and the plywood preformed curves
Next, plaster coating was applied over the top part of the cove while the bottom and all of the latticework was first covered with a green protective sealant. It’s a material that sort of holds everything together before the plasterwork is done. Finally, the cove was painted white.
Here’s what it looks like after completion:

The completed Infinity cove

Infinity Cove
Taylor’s infinity cove is a classic case of neighbor’s envy, owner’s pride. As one person commented,
“You just made a ton of photographers jealous.”
For Further Training on Studio Photography
Building a photography studio is only the beginning. Learn how you can take high-quality photos with off-camera flash—the easy, inexpensive, portable way to take professional photos.
Found here: The Flash Photography Course
Like This Article?
Don't Miss The Next One!
Join over 100,000 photographers of all experience levels who receive our free photography tips and articles to stay current:


Infinity coves are brilliant for a pure white background, but unless you’re studio is quite big or you find yourself shooting more Portraits than intricate products, they may not be such a great idea.
As nice as they are, we don’t have one in the studio because we prefer to keep the space as flexible as possible.
+plus having to keep repainting the cove after a while gets a bit tedious.
We’re in the process of getting looking a cove solutions for our studio. There’s a few companies out there (in the UK) that’ll build and install — but they’re not cheap — at least £8,000 for a 4×8 meter cove.
But looking at the process, doesn’t look too complicated to build yourself.
Great share
Amazing video!
Do you know what the green sealant used is?
Oh, and the grade/type of plywood?
I’ve always wondered if these were bought or custom built. The more I learn about photography, the commercial side at least, all of these problems we face have to be solved with handywood such as in the video.
Good Video… but a couple of things need to be clarified. The curved base pieces are indeed plywood… but the “bendable” plywood is called (at least here in the States) “Luan”… it’s a mahogany plywood less than 1/4” thick and it’s the main ingredient in building Sets in the Film Industry due to its light weight and flexibility. Also, the Carpenter is not using plaster to fill in the (drywall) screw holes; but using “Spackle” just as you would if doing a drywall job.