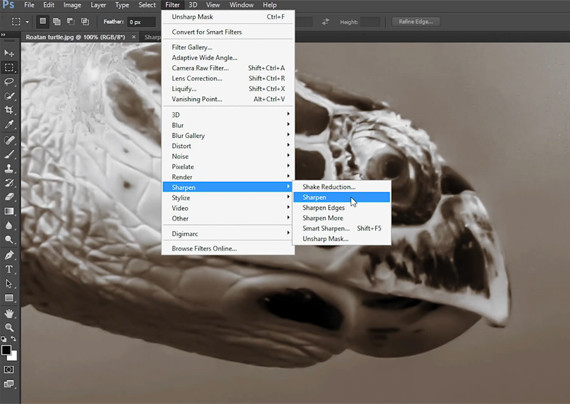
We all want our photographs to be tack sharp, right? Photoshop can help with that, but there are a bewildering number of choices when it comes to sharpening your images. Deke McClelland is here to demystify how Photoshop’s sharpening filters work:
How to Sharpen Your Photos in Photoshop
When preparing to sharpen an image, you’ll want to zoom in to at least a 100 percent view. That means that you’re viewing one image pixel for every screen pixel.
To sharpen, go to the Filter menu, and from there the Sharpen sub-menu.

The Sharpen sub-menu provides several different sharpen functions.
Within that sub-menu, we’ve got quite a few options. Shake Reduction isn’t really relevant here, so we’re going to skip it. Same goes for Sharpen and Sharpen Edges. McClelland explains that these are very old preset filters that were more useful when image files were considerably smaller.
Sharpen More
As with Sharpen and Sharpen Edges, Sharpen More yields bigger changes when applied to smaller image files.

McClelland’s shot of a sea turtle, pre-sharpening.
McClelland applies Sharpen More to his base image twice, just to give us an idea of what the sharpening function does.

The same image, after “Sharpen More” has been applied twice.
The Sharpen More function really sharpens pixel edges here. McClelland explains that an edge in a digital image is simply “the rapid transition between dark and light pixels.” Increasing contrast (making the bright edges brighter and the dark edges darker) at this transition zone makes the edges appear more defined.
Unsharp Mask
The Unsharp Mask function uses blur to sharpen an image and then uses masking to soften that effect. Selecting Unsharp Mask leads to a dialog box in which the amount of sharpening, radius, and threshold can be adjusted.

Unsharp Mask dialog box
Changing the Amount of sharpening is pretty straightforward here. Changing the Radius defines the thickness of the halo, which McClelland explains is the area around light and dark pixels in the image. In order to effectively sharpen edges without increasing contrast throughout the image, you’ll want to keep the Radius value around the three pixel mark for printed images, and even lower (around 0.5 pixels) for web images.
Threshold is the most technical setting here, because it refers to luminance levels. Increasing the the settings here means that you are telling Photoshop that adjacent pixels must be x number of levels different from each other in order to be sharpened. Playing with the Threshold can create a pockmarked effect, particularly in portraits—you might find yourself sharpening a subject’s pores rather than their eyes, for example.
Camera Raw
Camera Raw is not in the Sharpen sub-menu, but like our other sharpening options, it is accessible via the Filter menu. Selecting it brings up the Camera Raw menu, and here you’ll want to click on the Detail icon.

The “Detail” menu in the Camera Raw dialog box is found by clicking on the triangle icon.
The Radius value here increases the halo thickness, as it did in the Unsharp Mask function. McClelland recommends taking this down to 1.0.
You’ll also want to keep the Detail slider at the low end–otherwise you’ll increase the noise in the image. The Masking function is the most powerful here–it gives the softest transitions between sharpened areas.

You can preview which areas Camera Raw will sharpen by pressing the Alt key (Option key, for Mac) while moving the Masking slider.
Smart Sharpen
Last but not least, we have the Smart Sharpen function. Here, we can control the Amount, Radius, and Noise—and most importantly we have a Remove setting. When working with digital images, a better sharpening effect with nice, tactile halos is achieved by using Remove and selecting Lens Blur.

The “Smart Sharpen” dialog box.
Important Notes on Sharpening Photos
McClelland notes that it’s important to choose one of these sharpening techniques—not all of them! You don’t want to apply multiple levels of sharpening, because that will also increase noise within the image.
One of the most important statements in this video refers to the difference between focus and sharpening. McClelland notes that focus is a function of the lens element. Sharpening an image refers to sharpening the details in an image by sharpening the edges of pixels and/or increasing crispness of edges. Simply put, sharpening is a way of “taking edges and making them look more edgy.” Photoshop’s sharpen tools, while powerful, aren’t going to magically bring an out-of-focus shot into focus.
McClelland states,
“Photoshop is not capable of reaching back into your camera and modifying the focus, but it can make for a more tactile shot.”
Like This Article?
Don't Miss The Next One!
Join over 100,000 photographers of all experience levels who receive our free photography tips and articles to stay current:


I’m surprised High Pass Filter wasn’t mentioned! It’s quite similar to Unsharp Mask and many people find it easier than that method.