This photoshop tutorial is to help you learn how to create a shining effect either from the sun or any other light source in a picture.

Before Changes

After Changes
Ok, once you have the picture your going to work on open:
1. Create a new blank layer, (Layer > New > Layer).
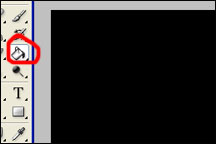
2. Use the Paint Bucket Tool and fill that layer with the color Black.

Paint Bucket Tool
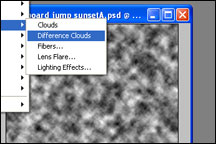
3. Then by using the filters menu render some difference clouds, (Filter>Render>Difference Clouds).
*If the clouds aren’t black and white you need to change the colors your working with.

Difference Clouds
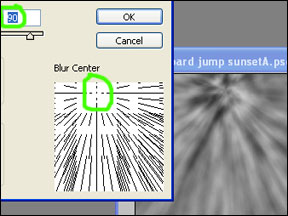
4. Then use another filter and apply a radial blur to the difference clouds with the center of the blur where the light source is in the picture, Run the intensity of the blur up around 90. (Filter>Blur>Radial Blur). In this picture the light source is a little to the left of the upper middle of the picture.

Radial Blur
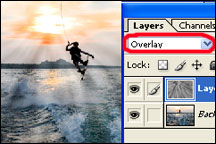
5. Then change the mode of the layer with the difference clouds on it to Overlay. (Another good mode to try might be Soft Light, you might like it better).

Overlay
*You probably won’t get it exactly the way you want it the first time so you might have to change the intensity of the radial blur or some other aspect of the process.

After Sun Rays Added
Like This Article?
Don't Miss The Next One!
Join over 100,000 photographers of all experience levels who receive our free photography tips and articles to stay current:


Cool, I got plenty of photos of sunset, I can now add some extra rays when needed ;)
Thank you! It’s simple and strait forward – just what we all need :)
It’s really nice tutorial and really helped me!!! Just wanted to add you can try with different mods and opacity till you get the best result :)
it’s really helpful for me … thank you
wow nice tutorial
Just what i needed, and was really easy and gave a good result :)
Thanks alot.
Loved this tip.
Thank you for this awesome thing.
So easy to follow and great effect!! Thanks a ton!
Interesting, now I really hooked more on photography! Thank you for the tips.
great stuff. works well
Wonderful , and you made this so easy;
Gave me alot of ideas:)
Thank you!
Just what I was looking for– to soften the look I simply reduced opacity. Easy, wonderful tutorial. Thank you!