When you first get your brand new, expensive and sophisticated DSLR or Mirrorless camera, you may be forgiven for thinking that’s all you really need to take good photos… and, for a time, you’re content to explore the myriad of features and settings that festoon the outer body of the camera, as well as those hidden among the many pages of your camera’s bottomless pit of menus and sub menus.
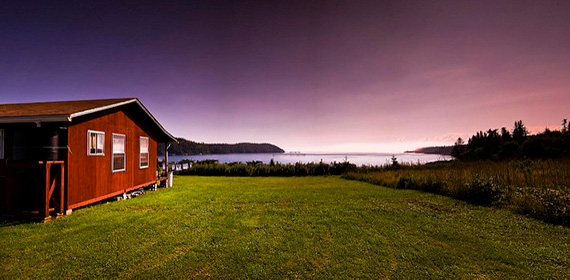
photo by Sean McGrath
This was my initial thinking when I chose to get into photography as a hobby. However, it wasn’t long after purchasing the camera and practicing using it on an almost daily basis that I found myself wanting that bit more.
One of the reasons for purchasing the camera was because I’d ruined my eyesight over a period of a few years by spending too much time working in front of a computer—and not doing much else—as I tried to build a business online. I chose photography as a way to, quite literally, focus and re-train my visual system to start looking farther afield, rather than just a few short feet in front of me (the approximate distance from my chair to the glare of my computer’s monitor), to try to exercise my eyesight back to a better state of health. For this reason, I was reluctant to try to improve my photos by shooting in the highly recommended RAW format and then spending time in front of a computer to edit the photos. Because of this, I recorded all my photos in JPEG format (letting the camera compress the images down into photos that can be instantly shared or printed) and chose to explore using filters as a way to enhance image quality.
Choosing Filters for Your DSLR
Before you purchase any filter for your camera, you first need to know the diameter of your lens, since the filter or a filter adapter will typically need to be screwed over the lens. The quickest way to find the diameter for your camera’s lenses is to take off the lens cap and look on the back of it – this is usually where the size, in millimeters (mm) is printed or engraved. For example, the camera I originally bought my filters for was a Panasonic FZ1000; it has a lens diameter of 62mm and so, on the back of its lens cap I found 62mm engraved into the plastic. With this information, I was able to search for all sorts of filters on Amazon, simply by typing in their name (e.g. circular polarizer) and adding 62mm into the search bar.
These are the four filters I accumulated over time, which might interest you:
1. Circular Polarizing Filter
A polarizing filter helps to cut through haze and glare from the rays of the sun; they’re a very useful filter for landscape photography. You can even use a polarizer to see through the surface of water, often revealing what’s hidden blow. You can also use these filters to remove glare from the sun’s reflections in water, and shiny surfaces, like leaves.

photo by Tiffany Von Arnim
Polarizers come in square or circular format, but it’s the latter—the circular polarizer – that is most often recommended, by photography experts, for DSLRs. So, that’s what I chose and the brand I purchased was the Marumi Exus Circular Polarizer. I’d had no experience of filters, so relied on a single, glowing review on Amazon, and I’m very pleased with the results. To use a circular polarizer, once screwed onto your camera’s lens, you’re able to rotate the filter, in either direction (just be careful not to unscrew the filter in the process!). Circular polarizers are said to be effective when you’re standing at about 90 degrees to the rays of the sun (so, with you facing forwards, if the sun is either to the left or right of you, as you look through your electronic viewfinder or on your DSLR’s LCD screen, you’re likely to be able to see the filter working as your rotate it on your lens). When it comes to landscape photography, colors in your image can appear richer and more vivid, when using a polarizing filter.
2. Graduated Neutral Density Filter Kit
When you look at scenes of contrasting light and shadow (such as out in nature), your own visual system is so sophisticated that, in one glance, you can see detail in both the sky and in shadier parts on the ground. However, at present, even the most sophisticated digital imaging sensor in modern DSLRs has difficult recording the details in the sky and the details on the ground, or in less well lit areas of your scene, at the same time. You may have noticed this when pointing your camera lens at the sky and using the autofocus system. With the correct camera settings, the sky will appear nicely exposed (ready for you to take the photo), but the ground elements will tend to be dark (and maybe too dark for you to see the detail in the resulting photos). Conversely, if you focus on the ground elements, the detail in the sky will be washed-out and lost to the brightness. You may be lucky with some wispy detail, but it’s nothing compared to how much detail you were able to get when focusing your camera directly on the sky, albeit at the expense of the ground detail.

photo by Kain Kalju
A solution for this is to use what is called a graduated neutral density filter, with square ND grad filter kits being the preferable option. With the ND grad filter kit, such as the Cokin P Series (H250A), which I purchased for my Panasonic FZ1000, you will need a ring adapter, which screws directly onto the lens (this is usually a separate purchase from the rest of the ND grad filter kit). On top of this, you slot the filter holder, into which you slot up to three different, rectangular pieces of Perspex, which are the filters. At one end, the filter is clear; at the other, it’s somewhat darkened; and, in between, they fade from darker to lighter, or vice versa (depending on how you look at them). If you place the dark gradient over the top portion of the lens, this will help the sensor expose ground and sky details more evenly.
3. 10-Stop Neutral Density Filter
The purpose of a 10-stop ND filter is to provide extra light reduction, to enable you to keep the shutter open for longer, exposing the camera’s sensor within to the constant motion of moving things, such as water and clouds, resulting in aesthetically pleasing motion blur. Water can appear silky smooth, and clouds can look like they’re whooshing through through the sky in your image.
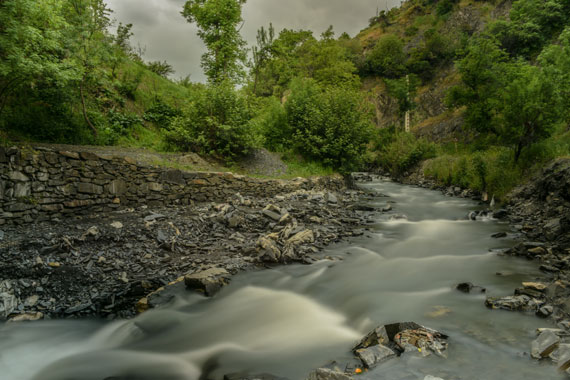
Photo by Hamed Mohtashami pouya; ISO 100, f/22.0, 20 second shutter, 28mm.
For my camera, I purchased a Hoya Pro ND 1000. It does its job as intended; I’ve no complaints with it.
4. FLW Magenta Colored Filter
This is a fun filter, made by Hoya and they’re very popular; so much so, it took me two months to get mine delivered, from the point of purchase on Amazon. However, it was worth the wait; these magenta color changing filters help to enhance the color of the sky, especially when photographing sunsets. The results can be dramatic and all achieved in camera (so there’s no need for Photoshop).
How to Avoid Costly Repeat Purchases When Buying a New DSLR Lens
A year or so after buying and enjoying using my Panasonic FZ1000, I upgraded from that bridge camera to a “proper” DSLR. I purchased a Panasonic GH4 and, for the first time, I had to contend with choosing and buying separate lens systems. It was only after those purchases that I suddenly realized that the diameter of the new lenses were not the 62mm of the lens on the FZ1000. Not only that, but one lens was 37mm, the other 58mm, so I was facing the choice of either only being able to use my filters on the FZ1000 or, gulp, potentially paying for up to two extra sets of each filter, so I could use them on either of the two new lenses. Now, the four filters mentioned earlier in this article, to which I am now referring, cost me near enough £200 (approximately US$280), so I was looking at quite a dent in my finances, after spending almost £2000 on the Panasonic GH4 and the two new lenses.
So, it was an unmitigated relief when I discovered that some clever person had invented stepping rings. These are basically individual metal rings that screw together, enabling you to screw one ring onto your lens, another onto your chosen filter, and however many intermediate sized rings it takes to help you either step up or step down from the lens to the filter.

photo by Paul Symes
It should be noted that it’s preferable if your lens is smaller than the filter (and not the other way round) because, if you’re trying to step down from a larger lens, onto a smaller filter, then you will encounter vignetting, which is when you see black edges around all of your images—these edges, in this case, will be the stepping rings that are getting in the way of your DSLR’s sensor.
The stepping rings typically come as a multi-piece kit. And, despite the number of rings in the kit, you won’t be using ALL of these adapters, just one ring for the lens, one for the filter, and, as already said, however many other rings it takes to join to two target units together.
So, money saved, all my filters able to be used for any size lens I currently own or may purchase in the future. Game on!
About the Author:
Graham Wadden created and maintains the Creative Commons photography website, WaddenCCPhotography, specializing in creating stock photography primarily for home educators and those in education.
Like This Article?
Don't Miss The Next One!
Join over 100,000 photographers of all experience levels who receive our free photography tips and articles to stay current:


You did suggest this, but it may be worthwhile to specifically state: In order to make sure one thinks ahead when purchasing filters, specifically any round filters, make sure to buy those that will fit not only the largest diameter lens you currently own but, more importantly, what you may own in the future. Then use step-down rings to match them to any smaller diameter lens. It’s a larger initial investment but will save one from having to buy more filters if one adds a larger lens to their kit.
I would simply sell the old gear and buy matching new gear for the newer dslr. However, you know the old truth: the best gear is that which you already own. I prefer to use mye olde large format box camera i made out of birds eye maple and some glue. Its amazing what adults forget that wAs taught in 1st grade. The other thing is:LOOK BOTH WAYS BEFORE YOU CROSS THE STREET!!