You just got your first DSLR camera and can’t wait to start taking some awesome pictures with it. But the manual for your camera is huge, and you’re not quite ready to trudge through it.
So what are the basic things you need to know to be able to use your new camera correctly? Here are some great pointers to help you take better pictures and possibly start a photography career down the road.
Shutter Speed
The shutter speed refers to how fast your shutter is opening and closing. The longer it’s open, the more light you’re letting in. If you have a slower shutter, you can capture motion blur; with a faster shutter, you’ll freeze the motion.
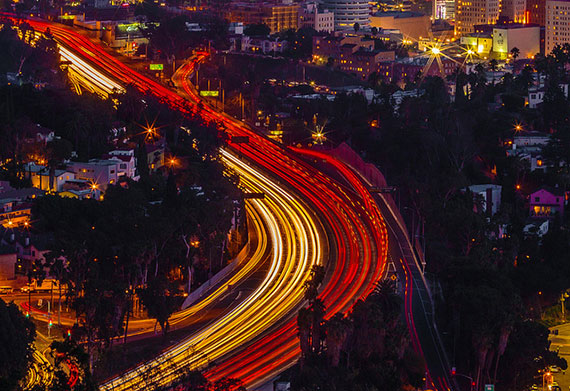
Photo by Gilad Rom; ISO 50, f/29.0, 30-second exposure.
Aperture
Aperture, or f-stop, refers to how wide the opening of your lens is. The wider it’s open, the more light you’re letting in. With a wide aperture, your lens blurs the background; with a small aperture, your background is more in focus.
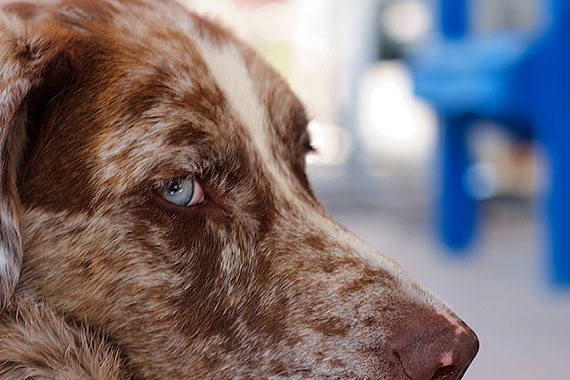
Photo by Alan Levine; ISO 100, f/3.5, 1/30-second exposure.
ISO
ISO refers to how sensitive your sensor is to the light that’s coming in. The higher your ISO, the brighter your image. With higher ISO, you’ll see more grain or “noise” in an image than you do with lower ISOs.
So you’ve got to decide which settings you’ll be using to make your picture brighter or darker. When you let in more light with one, you have to let in less light with the other to get the same exposure.

Photo by Geof Wilson; ISO 100, f/4.6, 6-second exposure.
Exposure
You’ve probably heard the term exposure when people talk about photography, but what does it mean? Well, it’s referring to how well lit your picture is. So when we talk about getting a “good” exposure, it really depends on which elements of your picture you want well lit. If you’re going for a silhouette, you’re looking for a good exposure of the sky, but your subjects are actually underexposed. If you want your subjects’ faces brightly lit against a bright sky, you’ll have to overexpose the sky so you can get a good exposure on the subjects. You need to decide which part of your picture to expose before you can figure out which aperture, shutter, and ISO to use.

Photo by David; ISO 200, f/11.0, 1/90-second exposure.
Aperture Priority Mode
You will likely see several settings on the dial of your new camera that determine how much control you have over your exposure. With AV mode, you’ll be able to decide which aperture and ISO you want to use, and your camera will decide the shutter speed for you. This could be used when you don’t mind whether your shutter goes fast or slow, and you want to be able to switch between having your background blurred or in focus.
Shutter Priority Mode
With TV mode, you’ll be able to choose the shutter and ISO, but your camera will decide the aperture for you. This can be used when you don’t mind whether your background is in focus or not, but you need to be able to switch between freezing the motion or getting motion blur.
Automatic Mode
With your camera on Auto, you won’t be able to choose any of the exposure settings because your camera will do it all for you. It does this by taking in light across the entire picture and guessing a proper exposure. This is most likely the mode people will choose when they have no idea how to operate the camera, because it takes no effort or knowledge at all. But there’s no way for your camera to realize that a bright sky is throwing off the light meter, or that you are trying to capture a silhouette, so automatic rarely gives you the best picture. For the most control over your light settings, it’s best to use Manual mode.
Manual Mode
With your camera dial set to Manual mode, you have full control over your shutter, aperture, and ISO, and how bright or dark your picture turns out. You’ll also have control over your flash and how bright it is, or whether you want it going off at all.
Focusing
Your lens will likely have an option to autofocus (AF) or manually focus (MF). With autofocus you can use the red focusing dots inside your viewfinder to determine where the lens is focusing. This is an easy way to get your focus perfect without having to adjust it manually. With manual focus, you will be able to adjust the lens to the focusing distance on your own.
RAW vs. JPG
Another important feature you’ll get to change is the option of shooting in RAW or JPEG. When shooting in JPEG mode, your camera compresses all of the information about the picture as soon as it’s captured, making adjustments more difficult in post-processing. When you change the quality to RAW, your camera retains all of the information about a picture inside the RAW file, so you’ll be able to easily make adjustments to the picture after you’ve captured it in a program like Adobe Camera RAW or Lightroom. With RAW files you’ll be able to maintain a high quality picture even if you’re making dramatic changes to the image. The only downside is that RAW files are much larger than JPEG files, so you’ll need a lot more memory both on the camera and on the computer to store your images.
About the Author:
This article was written by Bethany Sell from how to start photography with video training.
Like This Article?
Don't Miss The Next One!
Join over 100,000 photographers of all experience levels who receive our free photography tips and articles to stay current:


I just started on this photography field with low available camera storage.. Can you give me suggestion on which file is the best we can use to take picture on special occasion with. (either JPEG or RAW files?)
Between Aperture and Focussing, which part of these is better we can use to play on blurring the backgroud?
I never knew that you can shoot in raw mode, but as you said that would require more storage for a camera. So many things to ponder and process for a good shot, but it’s worth every minute of practicing and learning the trade. Thank you for this!
Wendy, Google it and you will find your answer. Its a easy as that.
Actually, there is another downside to using RAW: some photo programs can’t handle it, even with the drivers installed. If I have my Nikon set to RAW+ JPG(basic), I get two identical JPGs when I upload them. Once I tried setting it to RAW (only); now I’ve got about a hundred photos I can’t do anything with, because even though I installed the drivers, I can’t view more than a thumbnail.
would please suggest which Camera will full fill the above requirements?